Yesterday I showed my swaps for the Stampin' Up OnStage Event in Amsterdam and today I have a tutorial for the Christmas Picture Frame Ornament.
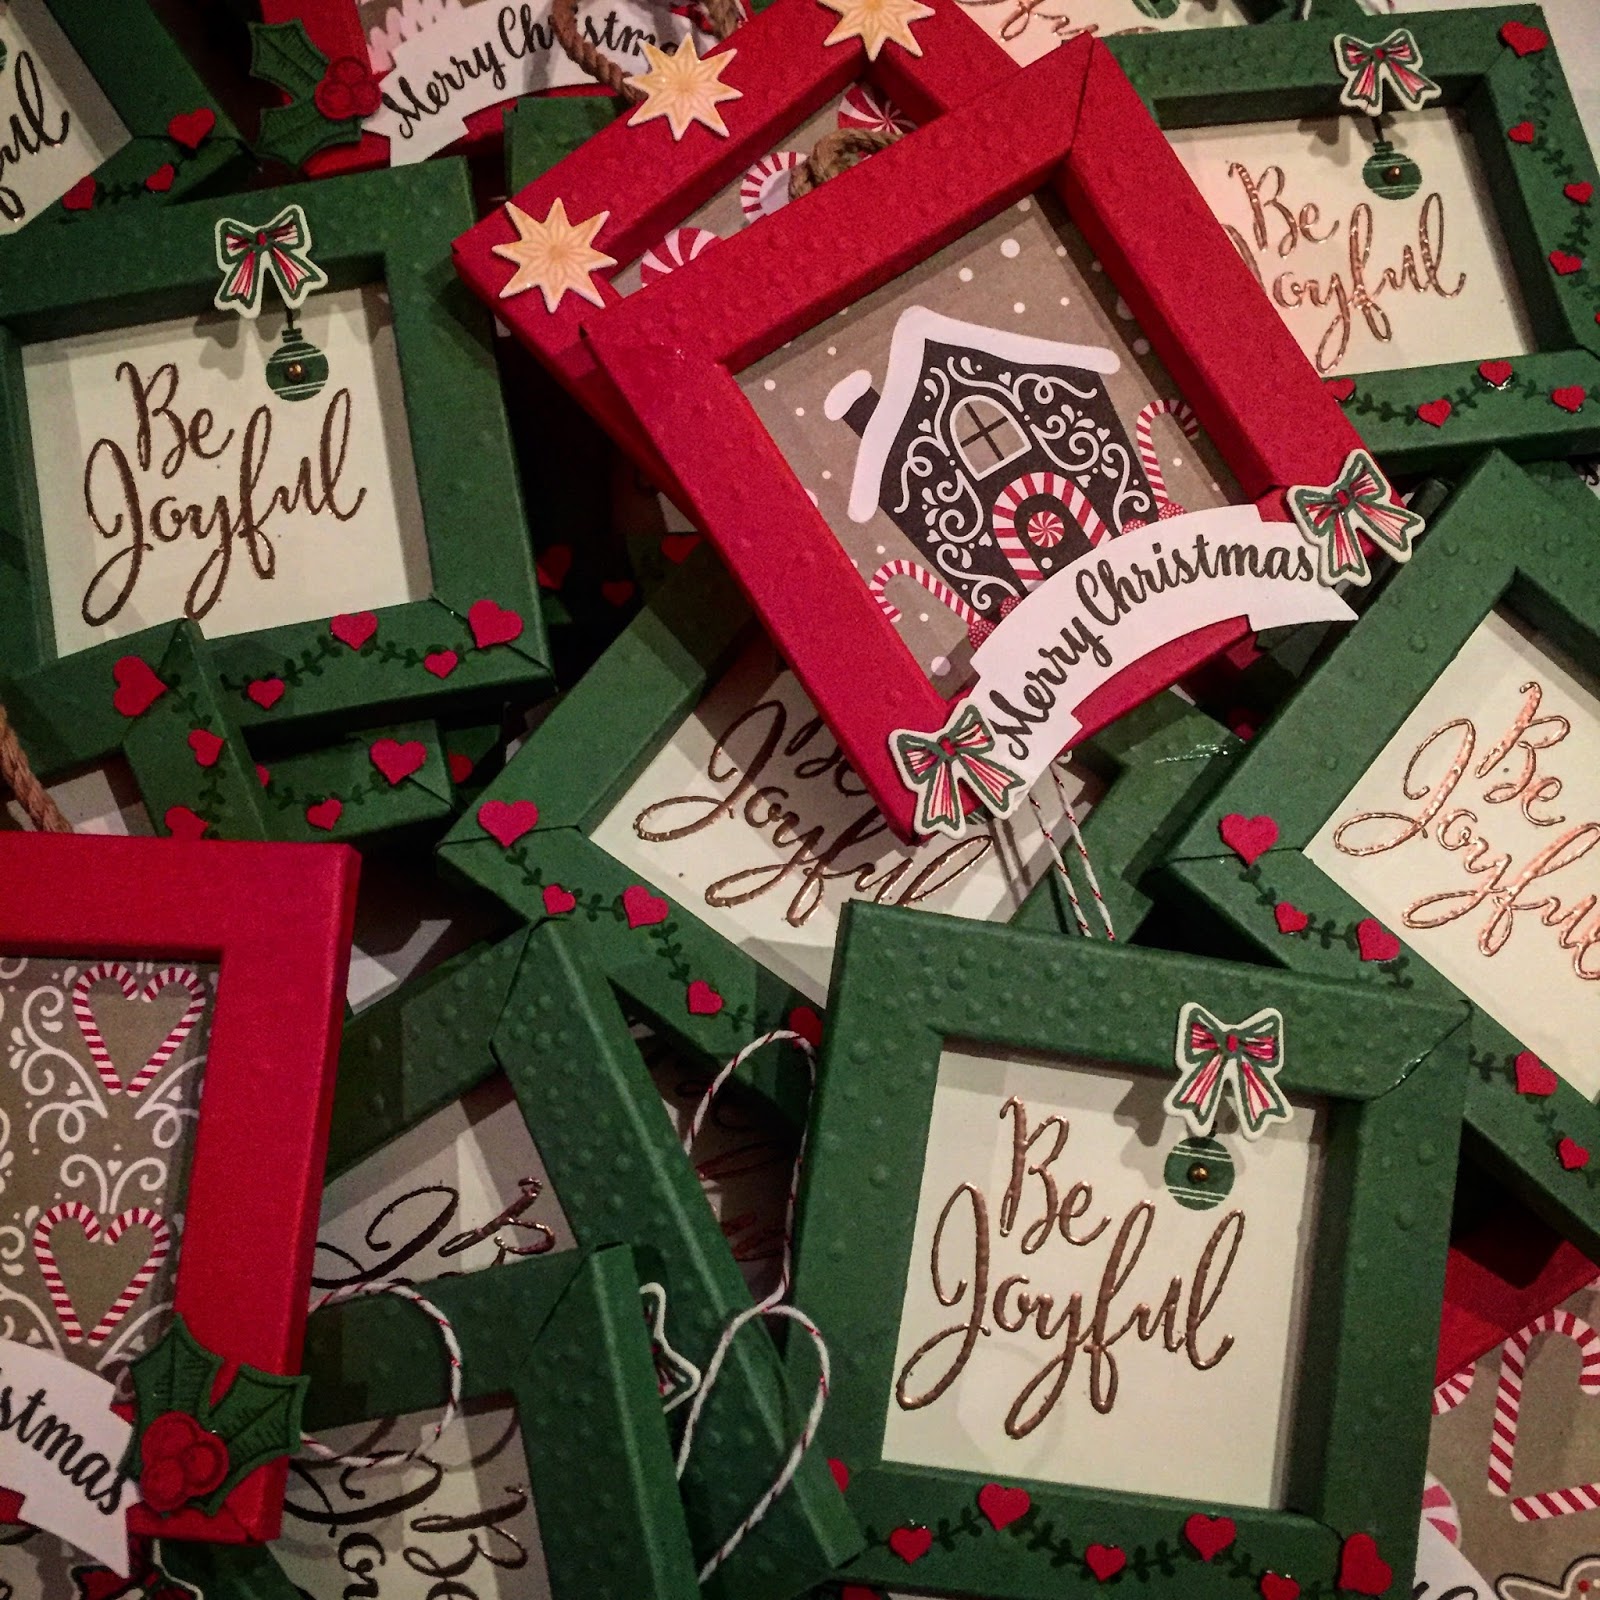 |
| De Picture Frames zijn gemaakt in de kleuren Garden Green en Real Red. |

Dit was het eerste ontwerp, maar het was toch niet helemaal wat ik wilde. Ik vind de stempel van Maria, Jozef en baby Jezus helemaal geweldig, dus ik ga zeker nog wel iets in deze trant maken voor de kerstmis.
This was the first design for the swaps, but it wasn't what I was looking for. I really like the stamp with the holy family so I certainly will make an other attempt for a little frame with this stamp before Christmas.
Maar nu eerst: de tutorial!
But for now: the tutorial!

1. Cut a piece of 6"x 6" cardstock in the desired color.
2. Run the cardstock trough the BigShot with the Softly Falling Embossing Folder.

3. Score the Cardstock on both sides at: 1/2" - 3/4"- 1 1/4" - 1 1/2" - 4 1/2" - 4 3/4" - 5 1/4" - 5 1/2"

4. Stamp a decorative bow in garden green with the little garland from the stamp set Christmas Pines.

5. Cut according to the picture below.

I forgot to take a picture with the little gaps in the sides! Oops!

So please, take a good look at the scetch I draw and cut out the little gaps at the arrows!

6. Stamp with Versamark the Be joyful-sentiment from the stamp set Merriest Wishes and emboss it with Copper.

7. Stamp a little Christmas Bulb from the Hostess set Cozy Critters in Garden Green and embellish with a little metallic enamel shape.

8. Glue the Very Vanille cardstock in the middle of the Garden Green. Fold on the score lines, slit the sides into each other and glue it together. I put a little double sided tape on the bottom on the frame and glued the corner close with the fine tip glue pen.
9. Embellish the frame with a little bow from the bundle Santa's Sleigh. I stamped the bow in Garden Green and with a Real Red Stampin' Marker I draw some lines (to create a candy cane-like effect).
10. Punch out some hearts in Real Red cardstock with the hearts border punch and glue them with the fine tip glue pen on the border on the bottom of the frame.
11. Get some baker's twine and make a little bow to hang the ornament in the tree. Attach the twine on the back with a little glue dot.

For the Real Red frames you can follow the instructions 1 - 5 . Don't stamp the little garland!!!
12. For the inside of the picture frame cut a 2 1/2" x 2 1/2" piece of Candy Cane Lane DSP. (I really love those little gingerbread houses!!!). Glue the dsp in the middel of the Real Red frame.

13. Stamp with Early Espresso the Merry Christmas sentiment form the stamp set Star of Light. The fun thing with photopolymere is that you can bend it into the shape you need.
14. Punch the Merry Christmas sentiment with the duet banner punch and glue it on the bottom of the frame.
15. Stamp the holly leaves (Garden Green cardstock and ink) and berries(Real Red cardstock and ink) with the Holly Berry Happiness Stamp Set and the Holly Berry Builder Punch and glue them next to the little banner.
16. You can stamp a little star in Crushed Curry from the stamp set Star of Light, use the thinlits and the BigShot to make a nice little star. You can use the star for further embellishment.
17. Cut a little Kraft Rope Trim to create a loop on the back so you can hang the little picture frame in the Christmas tree.
If you have any questions, please let me know!

